Noesis
This site exists mainly for automated bug tracking and release build distribution.
Index
Crash Report
Crash List
Build Version
Current Documentation
User Manual
Download
User Manual
Contents
1. Basic Functionality
This section covers basic program functionality which will apply to most novice users.
1.1. Installation
Noesis does not require an installation process, just download the latest version and unzip it somewhere, then run Noesis.exe.
To stay up to date with the latest Noesis build, there's a "Check for Updates" menu item under the application's Tools menu. Selecting this item will automatically check for available updates and, if any are available, Noesis will be updated in-place (wherever you're running it from) to the latest version.
Noesis is compatible with every version of Windows all the way back to Windows 2000. Because of this, most Wine distributions should be capable of running it fairly well under non-Windows operating systems. There are currently no plans for native ports to other operating systems.
Some components and plugins for Noesis may require MSVC++ 2010 runtimes to be installed. These runtimes can currently be downloaded from:
https://www.microsoft.com/en-us/download/details.aspx?id=5555
Older native binary plugins, which will still function with current versions of Noesis, may require 2005 runtimes. 2005 runtimes can currently be downloaded here:
https://www.microsoft.com/en-us/download/details.aspx?id=3387
If Microsoft has changed/removed the above links, you'll have to search for the runtime installation packages by name: "Microsoft Visual C++ 2010 Redistributable Package (x86)" and "Microsoft Visual C++ 2005 Redistributable Package (x86)"
1.2. Importing/Previewing Content
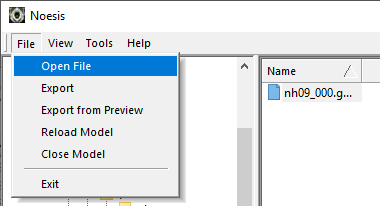
Supported file types can be loaded by browsing to and double-clicking on them with the shell controls that appear on the face of the application. You can also use File->Open File in the application menu, this is useful if you want to paste an absolute path to a directory or specific file.
Additionally, supported file types can be dragged and dropped onto the preview window to open them directly. Associations with file types are also supported.
Once a file is loaded in the preview window, the following controls are available:
- Left Mouse: While held, moving the mouse will rotate your view around the focal point.
- Left Mouse + CTRL: While held, moving the mouse up and down zooms your view in and out.
- Right Mouse: While held, moving the mouse will move your focal point in the scene, relative to the direction you're looking. Your focal point is represented by a green/red box at the center of the screen.
- Right Mouse + CTRL: While held, moving the mouse up and down moves your focal point "in" and "out" of the screen.
- Middle Mouse: Clicking the middle mouse button re-centers your view on the model. Scrolling the mousewheel does what Left Mouse + CTRL does, with a larger step length.
- The icons on the preview pane (and their corresponding F# keys) will change according to the type of content you are previewing and the data present. Info text, including shortcut keys, will appear when the preview window is in focus.
- The red/green focal point in the center of the screen will only appear while you are holding down the right mouse button. If the box is green, it is not obstructed, but if it's red, that means it's "behind" the geometry you're looking at. This is helpful for determining the distance to your focal point when trying to center in on some geometry.
If you zoom all the way in, you'll find that the left/right mouse operations change into "first person" view controls. This can be used in conjunction with the "Persistent settings->Other->WASD zoom controls" option in the Data Viewer for a Quake-style noclip experience.
For certain touch pads, tablets, and other special input devices, you may want to prevent cursor locking when clicking and moving. There is an option to disable this in the Data Viewer. See "Persistent settings->Other->Disable cursor locking".
1.3. Exporting Content
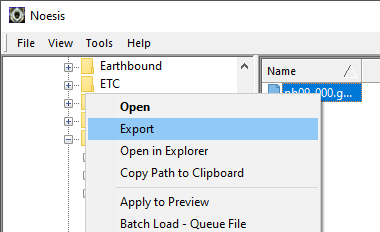
When a file is highlighted in the main application list view, you can use the File->Export option from the application menu, or right-click the file and select "Export" from the context menu which appears.
Selecting one of these options will bring up the export dialog, which will vary slightly depending on the type of content being exported. For model files, it should be noted that formats like WaveFront OBJ do not support a great deal of common model data (such as vertex blending information, skeletal information, and many types of per-vertex data), and formats like Autodesk FBX and glTF are generally preferable in that they preserve more of the data that's common to video game models.
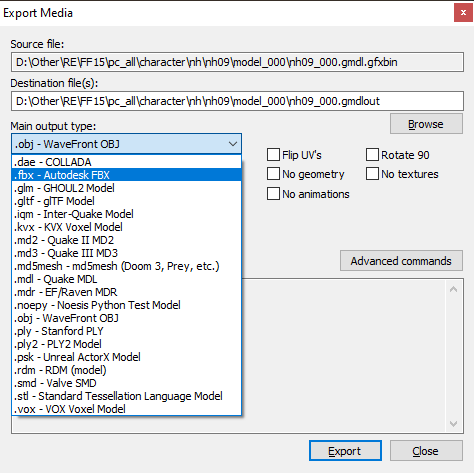
By default, the output path will simply add an "out" suffix to the source path as the default destination path, with the output extension being chosen by the selected exporter.
Whether additional content types (such as textures and animations) are exported along with a model is dependent upon the importer for the content being loaded. Some importers will explicitly load up textures and attach them (along with materials) to a given model, in which case the textures will be exported along with the model. If the textures are loaded automatically by the preview loader, however, they will not be exported as part of the model unless the advanced command "-exportprvtex" is used.
Some export targets, such as glTF, will elect to handle the export of secondary content types, such as textures, specially. In the case of glTF, texture export requests are filtered and handled by the exporter, and preview-loaded textures are gathered automatically. Similar behavior can be expected of the Quake MDL exporter, for example, which bakes all materials/textures into a single texture page.
Additionally, an "Export from Preview" option is available under the application's File menu. This functions similarly to the above mentioned export path, but exports data directly from whatever is loaded in the preview window. If the loaded content's data has been modified in any way, such as through the Data Viewer, these changes will be exported as well. Noesis is not generally intended as a tool to manually tweak data on its way through (although some tool plugins do exist to offer greater functionality in this area), but this path can be useful to perform minor tweaks to data via the Data Viewer.
1.4. Extracting Archives
Noesis can extract many different types of archives. In most cases where a given game's model/animation/etc. format is supported by Noesis, Noesis will also support extracting any applicable archive format used by that game. There are some exceptions to this rule, however, particularly for games which use common content formats along with a proprietary archive format.
When extracting an archive, just export the file as you would any other type of content. The export dialog will disable most of the output options, and the destination path will be a directory instead of an individual file path. Upon export, the contents of the archive will be written to the given path.
Currently, there are no plans to integrate a general archive viewer/browser into Noesis. However, plugins do exist to allow browsing and re-injecting files for certain archive formats.
1.5. Batch Export
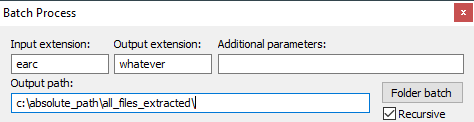
A Batch Process dialog is accessible under the application's Tools menu.
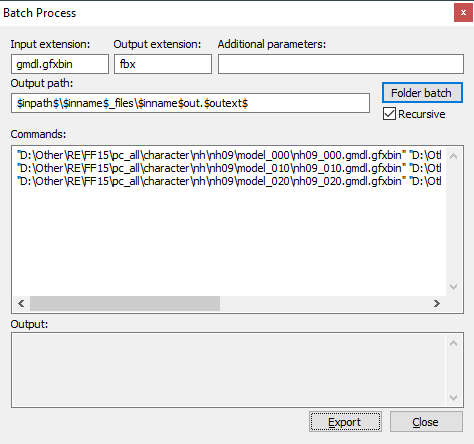
Clicking the "Folder batch" button will allow you to browse to a directory, and based on the extensions/parameters/path supplied, it will auto-populate the "Commands" window. Take care to check "Recursive" if you want to include everything under the selected directory as well. You can also manually populate the commands window and run arbitrary commands this way. Each line should contain the source file as the first argument, the destination file (or path, in the case of archives) as the second argument, and any other options/commands after that. Whether or not you use the "Folder batch" button to generate your command list, the commands won't actually be executed until you hit the "Export" button.
When batch exporting game archives (such as FF15 PC's "earc" files, for example), you may find that many individual archive files contain common or virtual paths. In this case, it isn't preferable to extract each file into a directory named after the individual file, you instead want to extract everything to a common location. In this case, you would want to change the output path from the default of "$inpath$\$inname$_files\$inname$out.$outext$" to something like "c:\absolute_path\all_files_extracted\". This will extract every archive, using the full archive path for each file, to a central location where relative paths can be used correctly for cross-asset references. Because the output extension is not used in this case, it doesn't matter what the field contains. For example:
1.6. Command Line Mode
Noesis can be run as a command line application by using ?cmode as the first command line argument. This allows you to quickly process files from external batch files or other automation tools. Syntax is Noesis.exe ?cmode infile.raw outfile.raw -options. An example batch file to convert one SMD model to RDM, rotating it 90 degrees, scaling it up to 2x the size, and prefixing texture names with the given string:
@echo off
Noesis.exe ?cmode "pl_male01_hi.smd" "pl_male01_hi.rdm" -rotate 90 0 0 -smdnorm -scale 2.0 -texpre "male01 tex_"
pause
Likewise, ?runtool can be used to execute tool plugins/scripts from the command line. For tools that uses noesis.getSelectedFile, a third parameter can be supplied on the command line to be returned as the selected file for that function. For example:
Noesis.exe ?runtool "&Get material info" "C:\Models\someninjaguy.gmd"
This command would execute the tool named "&Get material info" (the & is there because it's part of the tool's description string), and when that tool script calls noesis.getSelectedFile, it will receive the path for someninjaguy.gmd.
It should also be noted that Noesis can be invoked this way using any manner of shell scripting, and it's fairly trivial (assuming you have familiarity with shell scripting) to do your own batch proccessing this way rather than relying on the basic GUI interface that Noesis supplies for batch processing. This is also the recommended path for "going wide" and processing many different files simultaneously with parallel instances of Noesis.
2. Advanced Functionality
This section covers advanced program functionality. This stuff can get you into trouble if you don't really understand what you're doing.
2.1. Advanced Commands
If you bring up an export dialog and click the "Advanced commands" button, you'll get a complete spew of every available command:
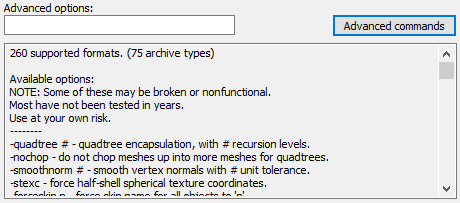
You can, of course, copy-paste the whole thing into notepad if you want to do a keyword search. The list starts with the common commands and continues into the format-specific commands. As the disclaimer notes, much of the functionality here is not well tested. Many of the available commands were implemented for specific projects or one-off uses, and have since fallen by the wayside. Some options may also appear to work fine, but break down under certain use cases.
With that said, if you're dealing with a particular game/format, it's definitely worth looking to see if there are any advanced commands for that module. Often times, experimental but fully functional features are exposed through these commands (e.g. UE4, FF15), and knowing when/how to use these commands can make your life a lot easier. You may also stumble upon magical and shockingly elaborate features that no one else has discovered.
2.2. Data Viewer
Accessible under the application's Tools menu, the Data Viewer allows inspection (and occasionally modification) of many different properties relating to the loaded content, as well as a whole bunch of internal Noesis settings. You can also search for keys/values using the search field at the bottom of the dialog.
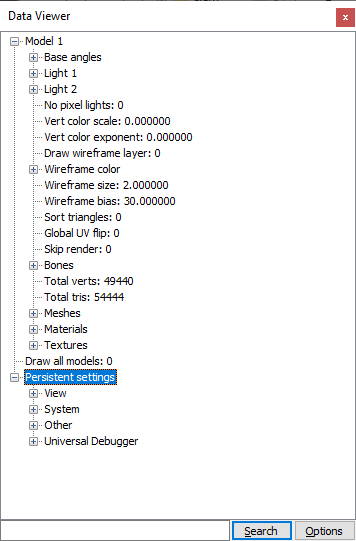
Everything under "Persistent settings" relates to (often hidden) Noesis features, some of which require a program restart to take effect. It's best to explore these options for yourself to see what applies to you, but some of the more notable ones include anaglyph (and other stereoscopic) rendering options, pixel picker functionality (for textures and other image data types), and occlusion/sprite/view/HDR/post/etc. rendering options.
The "Default preview commands" option (under "Persistent settings->Other") is also worth a mention. This field accepts any of the Advanced Commands as discussed above, normally used for exporting, and applies them to the loaded preview content. For example, I tend to use the following commands when browsing FF15 content:
-ff15occlmap -ff15softhair -ff15materials
This is also useful when browsing UE4 content, as it allows you to enable animation support and specify a base data path. (for importing package dependencies from loose package files)
When selecting various content properties in the Data Viewer, some will affect the preview rendering, such as meshes, bones, and textures. When selecting bones, holding shift and dragging the cursor with the left/right button held will rotate the bone's modelspace transform. This can be useful for testing weights and hierarchies. Additionally, underneath each mesh, a "UV view" property is present for each UV channel. These can also be selected to render a texture (selected based on which texture is associated with the given UV channel, if any) with UV coordinates in the preview window.
2.3. Optional Plugins
The Noesis distribution includes additional native plugins and scripts in an "optionalplugins" directory. These include support for additional formats, tools, and other uncommon or very specific functionality. A triangle picker plugin is also included, which allows you to highlight and select triangles in order to export them, or bring up the associated mesh/material in the Data Viewer.
Because random functionality is routinely tossed into optionalplugins, it's worth taking a look through the directory to see if anything is suited to your needs.
3. Troubleshooting
If you encounter errors on startup, or when selecting/opening files in Noesis, first try removing all of your third-party plugins and scripts. If the problems disappear after removing plugins/scripts, try adding them back one at a time. Once you find the plugin causing the problem, contact the author of that plugin and tell them that their plugin is busted.
If your problem appears to be on export to a specific format, where a file doesn't appear correct when imported into another program, try importing that same file back into Noesis. If the file looks correct in Noesis, there's a pretty good chance the fault is with the other program's importer and not Noesis's exporter. In this case, you should contact the author(s) of that other program and/or that program's import plugin.
If you have trouble using a plugin, such as the plugin not seeming to load or add the given format to the format list, make sure you have the latest MSVC++ 2005/2010 runtime package installed.
If you continue to encounter startup issues after removing thirdparty plugins/scripts, try running the Noesis with ?compat_nomemmod as the first argument on the command line. If this prevents crashing, you may have a virus on your system, or perhaps an over-zealous antivirus solution. If this does not resolve the issue, you can also try using ?compat_nogl as the first argument on the command line. This will disable all graphics module functionality (so the preview renderer will be disabled), but if it resolves your problem, there's a good chance that you just need to update your graphics drivers to fix the core problem.
If none of the above circumvents your issue, make sure you're using the latest version of Noesis. If you are, you may be looking at a genuine Noesis bug. Feel free to report your issue, but take care to provide plenty of detail about the circumstances, your system, and the data/game(s) you're working with. Direct replies to bug reports are not guaranteed. If you're intentionally vague with details or can't provide the data required to reproduce your issue(s), your report will likely go unanswered.