BigPEmu
The World's Prefurred Large Pussycat Emulator™
Home
Compatibility
FAQ
Bug Report
User Manual
Download
Contact

Patrons are my only source of support for ongoing improvements to BigPEmu. Please consider adding your support! As a patron, you'll be treated to regular behind-the-scenes updates, screenshots of works in progress, and special pre-release builds.
User Manual

Contents
1. Installation
BigPEmu doesn't require an installation process, just
download the latest version and
unzip it somewhere (with directory structure intact), then run the BigPEmu executable file.

To stay up to date with the latest version of BigPEmu, there's a "Check for Updates" menu item under the application's "Information" menu. Selecting this item will automatically check for available updates and, if any are available, BigPEmu will be updated in-place (wherever you're running it from) to the latest version.
2. Navigating the Menu
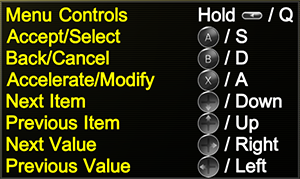
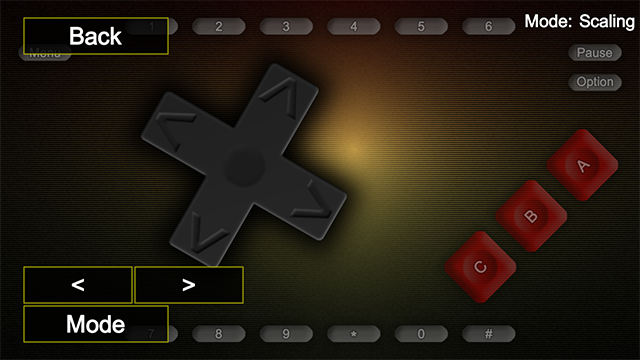
By default, the menu can be navigated with the arrow keys on the keyboard, with Enter and Escape functioning as "Accept" and "Cancel" (or "Back") respectively. You can hold the Jaguar's "Pause" button in the menu ("Q" on the keyboard by default) at any time to get a list of menu controls and their active bindings.
Any keys/buttons bound to the Jaguar's directional pad and face buttons can also be used to navigate the menu. This allows for intuitive default mappings for any device listed in the built-in controller database.
3. Loading Software
Software can be loaded from any of the supported file types (
.j64;.cof;.rom;.jag;.abs;.zip;.cue;.cdi;.bigpimg) through the "Load Software" menu item. This menu item will be selected by default. Note that supported file types may vary according to platform implementations/limitations.

BigPEmu also supports loading cartridge images through zip files, but be aware that it will just scan the top level directory in the zip file and accept the first file with a supported extension. The criteria for what BigPEmu will accept as a loadable cartridge image is very loose, by design. This means that it's not too difficult to make the emulator crash by throwing bad images at it, so you'll probably want to avoid doing that.
If you're playing a game from the Jaguar's retail library, it's strongly recommended that you make sure the 64-bit FNV-1a hash for the ROM image you're loading matches the hash listed on the
compatibility page. The hash for your ROM image will be visible in the upper-right of the browser by default:
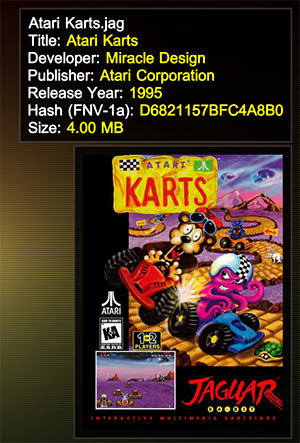
If the hash for your image does not match the hash provided on the compatibility page, compatibility is not guaranteed. Bug reports will not be accepted in cases of bad dumps, ROM images with missing headers, and so on. It should also be noted that for disc-based images, in order to avoid reading the entire image, the calculated hash is only based on the ToC (which may be partially derived if the image is missing information) and part of the boot track. This means that in addition to making sure the FNV-1a hash matches the one given on the compatibility page, you should use an alternate checksum to verify that your image matches a good source and is known to run well on hardware.
When working with disc images, it may be preferable (or required, depending on your platform of choice) to use the BigPImage (
.bigpimg) format for improved performance. BigPImage files can be created from within BigPEmu through the developer menu, from physical media or any of the emulator's supported disc image formats. The developer menu can be enabled by invoking the developer mode
command line option. If you require further assistance,
this video functions as a step-by-step guide for the creation of BigPImage files. If you're trying to create a BigPImage file from an otherwise-unsupported disc image format, you might consider using a third party solution to mount your image as a virtual drive. This will allow you to create a BigPImage file using the physical media path.
4. Configuring Input
Through the stock input plugin, BigPEmu supports virtually any input device that your system recognizes. If the device is already in the internal controller database and it's attached when you run BigPEmu for the first time, input bindings will be automatically assigned for the device. Typically, "Input Device 1" will correspond to player 1's controller, "Input Device 2" will correspond to player's 2 controller, and so on. However, this mapping can get complicated with Team Tap emulation. See the emulator's in-menu description prompts for details.
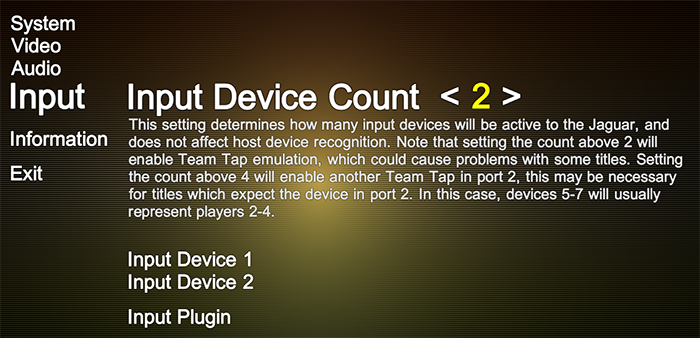
If you wish to swap devices or assign inputs for a newly-connected device, you'll need to go into the appropriate device input menu and use "Reset All" in the binding menu in order to assign defaults for the new device. Rather than resetting, you can also manually assign inputs for your device of choice. Manually assigning inputs will also be necessary in cases where your input device doesn't have its own mapping in the controller database.
Every input device in the controller database will effectively be mapped to Xbox controller inputs. You'll also see Xbox button/analog/etc. glyphs in the interface. Specialized glyph sets for different controller types may be added in the future. For now, if you don't have an Xbox controller, you get to do some extra mental gymnastics.
Under each input device, you will be able to set the device type (choosing from a variety of supported native Jaguar input devices), as well as enter the binding menu:
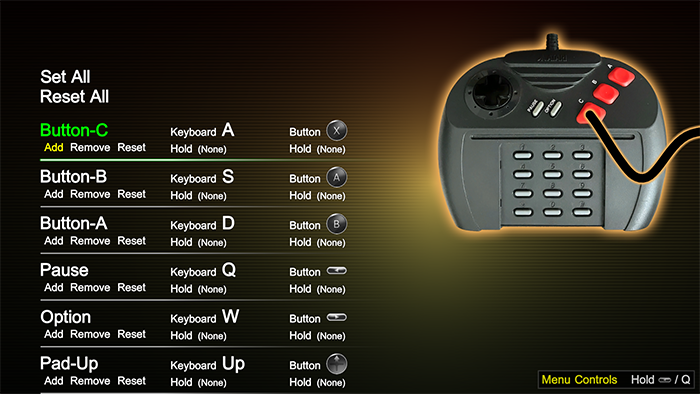
The binding menu offers a great deal of flexibility. You can specify a number of different potential triggers for each Jaguar input, and specify an optional hold input for each trigger. The default binding setup uses the "left trigger" (or your input device's equivalent) as a hold key in order to map many of the controller's buttons to buttons on the Jaguar's number pad when the trigger is held. However, it may often be preferable to map those Jaguar inputs to something like directions on an analog stick. The system allows this, and analog/digital inputs can be bound to Jaguar analog/digital inputs interchangeably.
Additionally, it will often by more convenient to use the "Set All" option near the top of the binding menu instead of navigating through and changing each trigger manually.
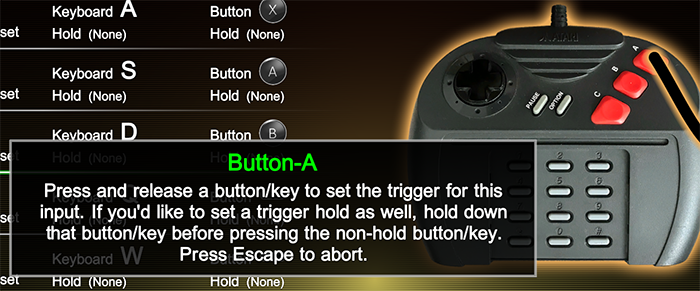
Set All will prompt you to provide an input for each Jaguar input, and will automatically overwrite any existing triggers which are provided by the device for which you've provided the new input. What a confusing sentence! Trust me, though, it's not too complicated.
It may also be important to
take note of the "Share Xbox Triggers" option in the Input menu. If you have an Xbox controller and you've found that the triggers are incorrectly bound, try enabling this option and resetting the device's bindings. Because of a Microsoft engineer's ancient sin, we have ended up in a situation where a given controller masquerading under a single GUID can either share a single analog axis for the triggers or use separate axes, and we don't have a good way of knowing which (maybe checking driver versions and getting into crappy process permission issues, but to hell with that), and this is why manual intervention may still be necessary here. Normally, I would advise you to try updating the drivers for your device, but in many cases Microsoft has also made that impossible for mysterious (maybe terrible) reasons.
Another tool that you may find helpful is the Input Overlay. This overlay is a toggle which can be assigned to any key, you'll see it near the end of the input list in the binds menu. The scale and placement of this overlay is customizable through the Input menu.
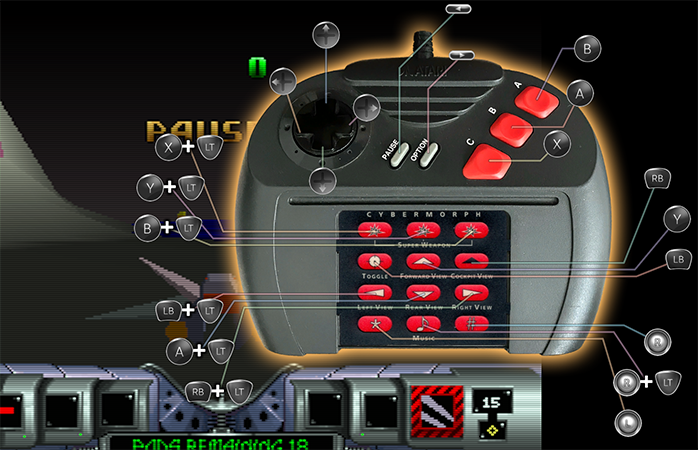
It is a terrifying sight to behold after first, but once you adjust, it can be a helpful way to quickly remember the bindings for those number pad keys if you have a fairly complicated setup like this one. As you can see in this Cybermorph example, if you've provided a pad overlay image for the currently loaded software, it will also be composited into the controller image for this overlay.
Additionally, although BigPEmu doesn't use SDL (at least not in any of the stock plugins), it does support SDL-style
gamecontrollerdb.txt files! If you put this file in the same directory as the BigPEmu executable, it will be used instead of the internal database. This is another means by which, if you prefer it to just manually adjusting binds in the emulator, you can adjust the defaults for your device or add mappings for new devices.
5. Customization
BigPEmu allows you to specify custom images for backgrounds, box art, and controller overlays. It also looks for the same MRQ files used by
Jaguar Game Drive, in order to provide title metadata as well as (low resolution) box art. Here's an example of a fully decked out setup for Cybermorph:

Take note of each name/extension suffix here. Each file has the following role:
.mrq - The JGD-format MRQ file. Provides additional title metadata.
.png - High-resolution box art. This overrides the low-resolution box art in the MRQ file, which would otherwise be used in absence of the PNG.
_bg.png - This background will be displayed behind the visible area when the software is loaded. It will automatically be stretched to the extent of the application's viewport, so it's up to you to find/create an image with an aspect ratio and resolution that looks good with your settings.
_padol.png - This image will be composited into the Jaguar controller in both the binding menu and the Input Overlay.
You can find the example Cybermorph pad overlay image
here. Thanks to
AtariAge for the source image. Stick to the image space in the
cm_padol.png, and you'll be good to go in creating your own overlay images. As you can see, it's fine to leave the tags in, they'll be handled in the compositing. Just remember that the alpha channel is still important!
It's also possible to specify a global background for all software, keeping in mind that it will be overridden if a software-specific background image exists. This is done by placing a
bg_common.png file next to the BigPEmu executable. Whenever this file is present, it will be used as the default background. If you want something more interesting than a static image for your background, however, that's what
screen effects are for!
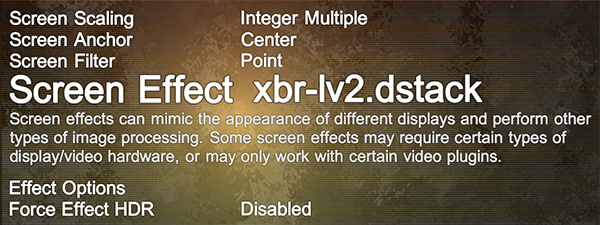
6. Screen Effects
Screen effects are represented by
.dstack (Dick's Post Stack) files, located in BigPEmu's
Data/ScreenEffects directory. These files are parsed as JSON and specify one or more passes, with each pass specifying a vertex/pixel shader and potentially referencing other passes or additional (texture) resources. Screen effects can be selected under the Video menu, and the effect browser is populated by the
.dstack files in
Data/ScreenEffects.
To you, our precious End User, screen effects represent some bitchin' effects. BigPEmu includes some basic (demonstrative) effects, as well as a few excellent shaders written by
Hyllian, which I've taken the liberty of auto-translating into the Dick Stack system.
The Shadertoy screen effect, using some unmodified Shadertoy code thanks to assistance from the Shadertoy template.
BigPEmu also comes with a Shadertoy template, which by default includes
this shader by Matt Halford. You will probably not want to play this way, unless you spent your Jaguar years in a fallout shelter playing on a CRT with a wide array of severely damaged components. However, it's here for demonstrative purposes. You can copy-paste Shadertoys straight into
shadertoy.glsl to apply them as screen effects. The template functionality is fairly minimal, so if you get into more advanced effects which depend on additional resources, you'll have to make some modifications to the
.dstack and template files.
Screen effect passes can also render outside of the game region, set blend modes, and achieve quite a few interesting effects with a minimal number of passes.
The system itself supports shader inputs in a variety of languages including GLSL, ESSL, and HLSL. Both OpenGL and D3D video plugins exist for BigPEmu, and you can use
BigPShaderTool to author shader binary packages which are compatible with the D3D renderer.
BigPShaderTool supports automatically translating GLSL shaders to D3D-compatible shader packages, and it can auto-translate RetroArch's
.slangp ("preset") files directly over to the Dick Stack system. I don't guarantee that it supports the whole gamut of RetroArch's preset/shader functionality, or that it produces good/efficient output, but it seems to work well enough on the stuff I've tried.
I've taken the liberty of auto-translating a few of those preset files with BigPShaderTool, which you can download
here. Extract that zip straight into
Data/ScreenEffects, and you'll be all set. Check the included documentation (and probably do some amateur sleuthing) for information on the complicated web of licensing/copyrights. I'm not totally sure who owns what in there, so I would probably not want to distribute any of it in direct connection to anything else, but it does include
this excellent Mega Bezel shader by HyperspaceMadness. (and by quite a few others, from what I gather)

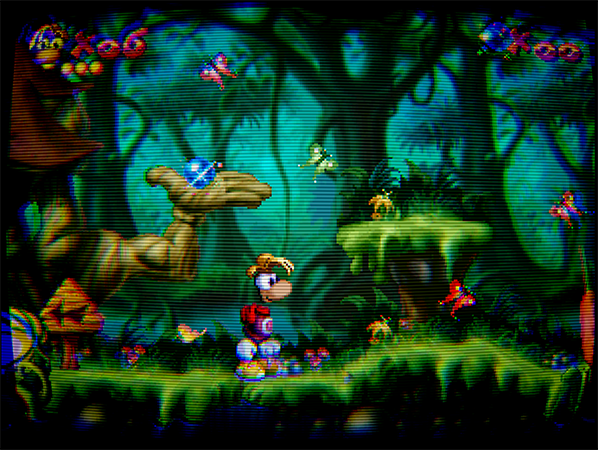
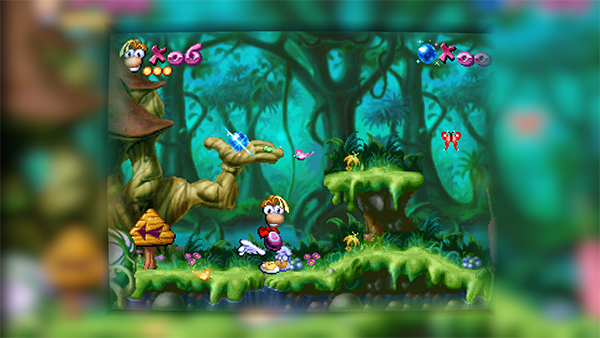
Indeed, it's hard to find a game that doesn't look good with a nice Dick Stack at 4K in HDR.
7. Per-Game Profiles
BigPEmu supports per-game profiles. This is accomplished by creating a BigPEmu configuration file of the same name/path as the software image you're loading, with a
.bigpcfg extension. For example, if your software image file is named
Cybermorph.j64, you would create a
Cybermorph.bigpcfg file alongside it.
In order to create the per-game configuration file, it's recommended that you just make a copy of your central BigPEmu configuration file. Under Windows, you can find this file at
%APPDATA%\BigPEmu\BigPEmuConfig.bigpcfg. (which usually resolves to something like
C:\Users\YourUsername\AppData\Roaming\BigPEmu\BigPEmuConfig.bigpcfg) Other platforms may vary. It's sufficient to simply copy this file and rename it.
On platforms where software images must be imported (such as iOS), this functionality will generally be similar. However, on these platforms, you'll also need to import the
.bigpcfg file (which you've copied/renamed as outlined above) for it to be used by the emulator. Configuration files can be imported through the normal "Import Files" interface. When duplicating and renaming your central
.bigpcfg file in order to import it, note again that the location of this
.bigpcfg file will vary per platform. On platforms like iOS, it can be found in the
UserData directory.
Once you've created the game-specific configuration file, all configuration changes made through the menus while the game in question is loaded will apply and be saved only to this configuration file. If the software is unloaded, the central configuration will be loaded again.
8. Exploring Features
BigPEmu is packed full of all kinds of special options and features. These options allow you to fine-tune virtually every aspect of your Jaguar experience. Don't be afraid to explore the menus! You'll find that nearly every menu item has some (usually rather elaborate) descriptive text which pops up when you highlight it!
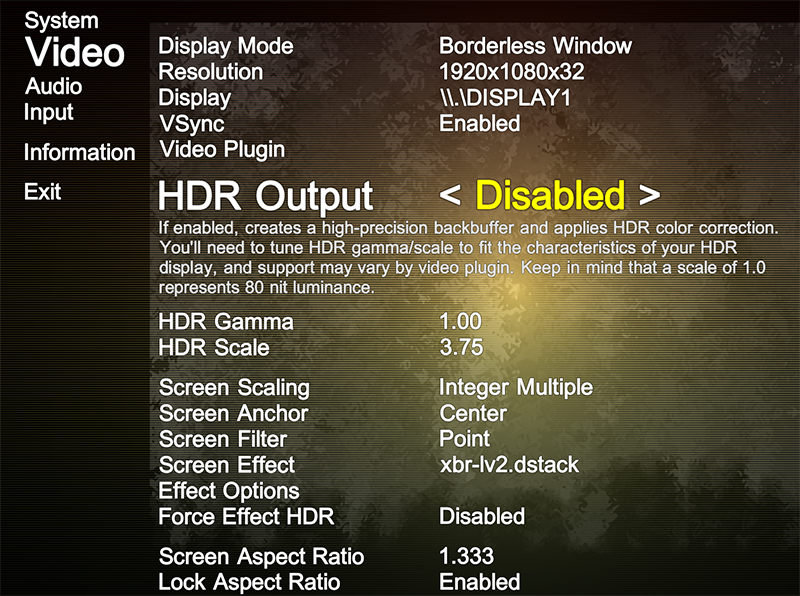
As seen above, the menu takes care to tell you exactly what you're getting yourself into with the HDR options. You'll find the same thing everywhere. More video options, audio processing and buffering options, and options which allow you to modify and enhance the Jaguar itself. Every option is designed to bring you joy, or maybe sorrow, so take a look around and enjoy every little crevice of BigPEmu.
9. Platform Features
BigPEmu comes equipped with a great deal of platform-specific functionality, which you may notice while perusing the menus on your platform of choice. It's worth taking a moment to explore in order to find the options which suit you, but here are some of the highlights.
Gyroscope Control
On relevant platforms (such as iOS), you'll find a "Gyroscope Settings" menu under the "Input" menu. This menu allows you to enable and tune gyroscope-based input. Gyroscope input functions as a standard analog input, so after you enable it, you'll need to go into the bindings menu for the relevant input device to associate gyroscope inputs with the desired Jaguar inputs. You may attach gyroscope input to both analog and digital inputs. When binding the gyroscope to an input, hold the device perfectly upright before entering the binding menu, then tilt the device in the desired direction before returning it to the upright position during the binding process. You may need to adjust the gyroscope dead zones if you find that the gyroscope is producing too much noise during this process.
Swipe Control
Any platform which supports touch-based input (including Windows/Linux, when touch interface functionality is enabled through the "Touch-Based UI" option) allows for swipe-based input. This is enabled primarily by setting the "Swipe Sensitivity" in the "Touch Settings" (located under "Input") menu. Usually a value between 8.0 and 10.0 is a good start, but this is subject to your personal preferences and the software of choice. In the same menu, you'll find more options for fine-tuning swipe control and mapping swipe velocity to analog intensity. When swipe control is enabled, swipes function additively over analog intensities for all inputs, so no binding is necessary. When using swipe control, you may also wish to hide/shrink some of the existing touch elements to give yourself more screen real estate to swipe upon. (if, for example, swipe input is able to replace some of the other input functions in your software of choice)
Touch Overlay Customization
Every aspect of the touch overlay is fully customisable, mostly through the "Touch Settings" menu. You'll also find a "Customize Layout" item in this menu, which gives you full control over every touch element. Separate profiles are maintained for landscape and portrait device orientations. This menu also allows you to adjust the individual hotspots on each touch element to suit your preferences.
Every aspect of the touch overlay's apperance can be customized. Some platforms may offer a "Custom Assets" menu for swapping out graphics for each element in the interface, while other platforms offer this functionality implicitly through image files placed alongside the emulator. You may also wish to take note of the "Overlay Idle Time" setting, which can be useful when not using touch-based input on platforms where touch-based input is enabled by default.
BigPEmu will always default to trying its best to avoid dropping frames, because in the world of emulation, dropping frames is very disruptive. However, certain mobile platforms make this more problematic than it should be! At the time of this writing (on a third-generation iPhone SE running iOS 17, as well as an iPhone 13 running iOS 18 in Game Mode), iOS is making some very poor scheduling decisions. If the emulator pumps the brakes on the emulation thread when it fills its buffers and the main thread is already idling between presentations, the iOS scheduler takes this as a hint to deprioritize the entire process. This happens regardless of scheduling policy and QoS category/priority. Once the scheduler does this, the OS begins starving the process out and intemittently forcing it to miss the 60Hz mark. In essence, because an engineer at Apple made a very bad choice at some point, the OS punishes the application for being too efficient. On the other hand, if we mindlessly continue burning cycles and wasting battery on the emulation thread, this deprioritization never occurs and we keep running within those 16.6ms windows with no trouble. (as a point of interest, it doesn't matter which thread is mindlessly burning cycles; a new thread can be spawned off which does nothing but loop on a yield, and it'll still be enough to trick the scheduler)
Now that I've made you suffer through that technical explanation, I'll tell you what you can do about it. You can effectively force the emulator into its most efficient, single-threaded mode by enabling the "Energy Conservation" option in the Jaguar's system settings. (under "System" and "Settings" in the menu) If your device isn't already struggling to keep up with emulation, you may find that this mode greatly reduces heat and battery consumption. However, on iOS in particular, be warned that this will make the process prone to suffering at the hands of the aforementioned flaw in the scheduler. You may notice more periodic disruptions/warping in the audio and visible stutters as a result.
Haptics
Relevant platforms will have a "Haptics Settings" menu under the "Touch Settings" menu. In this menu, you can customize haptic feedback for each touch element type. By default, different sensations are provided to reflect the different types of tactile response you'd experience with a real Jaguar controller.
Data Accessibility
BigPEmu automatically creates an accessible application folder on relevant platforms, which contains all of your saved states and other user-specific data in a "UserData" folder.
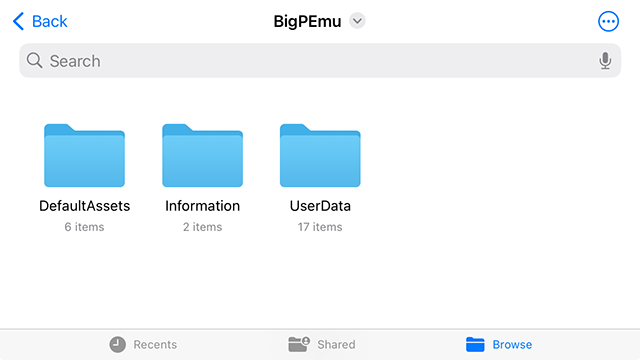
This functionality allows you to create backups of your data or bring your saved states over from other platforms/devices. On iOS, you may also elect to use cloud-synchronized folders to conveniently manage your data across devices.
10. Command Line Options
BigPEmu always expects the first command line argument to be a software (e.g. cartridge) image path. This also allows BigPEmu to be associated with image file extensions, to auto-load an image when it's drag-and-dropped onto the executable, and so on. When launching BigPEmu with a ROM on the command line, the intro sequence is also skipped. If you'd like to skip the intro and load directly into the menu without actually loading any software, specify * in place of a valid path.
All additional command line options must come after the first path argument, whether it's a valid path or an asterisk. Available options are:
-forcewidth #
Forces the display width, where # is the width. This will override settings and bypass checks to determine if the resolution is available on the active display, so take care when using it.
-forceheight #
As above, for display height.
-windowx #
Specifies the X coordinate of the window. Useful for positioning multiple instances of the emulator for splitscreen configurations.
-windowy #
As above, for the Y coordinate.
-noborder
Runs with no border in windowed mode.
-alwaystop
Forces the window to always sort above other windows.
-bginput
Accept input even when the window isn't in focus. Use with caution.
-eeprombits #
Forces # bits of EEPROM address space. This also overrides any MRQ-based setting, if one is present.
-forceloadaddr #
Forces # as the ROM image load address. As above, overrides MRQ.
-forcerunaddr #
Forces # as the initial M68K execution address. As above, overrides MRQ.
-forcecompat
Tells the video plugin to force compatibility mode. In the OpenGL video plugin, this forces fixed function OpenGL 1.0 mode, and it is not recommended. Things will be ugly and screen effects will be disabled. However, if something ruinous is happening with your hardware and/or display drivers, this may yet be the option for you.
-forcegpusync
Tells the video plugin to synchronize with the GPU at the start of every frame. This may reduce input latency, but may result in missed frames and other performance problems.
-nodevicechange
Disables all handling of "device change" messages. This means changes to USB device nodes will not be handled/recognized.
-fulldevrefresh
Each time input device changes are detected, forces a full release/acquire process for each device.
-localdata
Reads/writes all user data (configuration, saved states, screenshots, etc.) in a local (next to executable) "UserData" directory instead of the OS-dependent path.
-cfgpath name
Specifies a custom name for the configuration file. Useful for running under different profiles without depending on per-game configurations.
-cfgpathabs name
As above, but specifies an absolute system file path instead of a local name.
-setcfgprop key value
Can be used to set configuration file properties from the command line.
-setcfgpropcat key value category
As above, but specifies a third category (e.g. "Video") argument.
-audiocapindex #
Specifies the audio capture device index, useful when launching *VirtualDisc_SystemAudio as the ROM image. The zero-based index corresponds to the order of devices as seen when launching the System Audio disc through the GUI.
-physdevindex #
Specifies the physical storage device index, useful when launching *VirtualDisc_SystemPath as the ROM image. The zero-based index corresponds to the order of devices as seen in the Physical Discs menu.
-netlisten
Immediately launches into a network session as the host.
-netconnect hostname
Immediately attempts to connect to the provided host.
-netport #
Specifies a non-default port to host/connect on.
-netmax #
Specifies the maximum number of connections that will be accepted by a server. The default is 32.
-netloaddelay #
Specifies a local delay, in milliseconds, to apply before loading state data sent over the network.
-netpcldelay #
As a network host, specifies an incremental delay, in milliseconds, to provide to clients as a delay before loading state data.
-nettcp
Use TCP as the underlying socket protocol, instead of the default reliable-UDP implementation. Not recommended and mainly here for diagnostics.
-uiscale #
Scales the user interface by a factor of #.
-menunodex #
Horizontally offsets menu items by #.
-menunodey #
Vertically offsets menu items by #.
-reguri
Registers a custom URI for the emulator. May not be implemented on all platforms. This allows the system to recognize the emulator-specific URL scheme employed by the
BigMaster server list.
Enables logging to a debug_log.txt file next to the executable. Useful if you're developing a screen effect, or if the emulator is refusing to start.
-conout
Similar to -logging, but creates a separate console window (on supported platforms) to receive messages instead of directing them to a file.
-devmode
Enables various menu and control options intended for developers.
Some command line options also exist for the internal Benjamin Kitten auto-regression tester. I'm not bothering to document them for the time being, because normally aging humans probably won't have a use for them.
BigPEmu has a custom localization system, designed to make additional language support both easy and efficient. Any text file in BigPEmu's Strings directory will be seen as a language file. Language files should all be encoded as UTF-16. (it's convenient for the system, as I do enjoy the benefits of linear string data over the small increase in memory footprint)
If you're finding that BigPEmu is displaying a lot of characters for your paths in the file browser as question marks, it's probably because you're using characters that aren't included in the default character set and aren't used in any of the localized text. A fun trick to get around this is to make a dummy string (just call it STR_DUMMY) in the localized text file and include all of the characters of interest in that string. BigPEmu will regenerate the font cache on startup to include those characters. Note that you may also need to change the LOC_SETTING_FONTCHARSET setting in the language file, if the desired characters don't exist in the selected/default character set.
If you want to add support for a new language to BigPEmu, great! Just keep a couple of things in mind. First, BigPEmu is under active development, so future versions could invalidate your language file or leave a lot of new options untranslated. Second, please don't distribute BigPEmu in its entirety along with your language file. Instead, please distribute the language file alone and direct people to download BigPEmu from the official site. This solves many problems (including bug reports from stale builds which users don't think to update) and eliminates some of the potential for unofficial, virus-ridden emulator builds to begin circulating. (either intentionally, or unintentionally as a result of passive executable modifications occurring on an infected system)
When distributing a language file, it's also recommended that you distribute the generated .bigpfc file alongside it. This will eliminate any font/character set dependencies on the user's system, and will ensure that everyone sees the same thing when using your language file. It's also possible that BigPEmu will be ported to platforms where native character set availability is limited, or font cache generation is not supported at all.
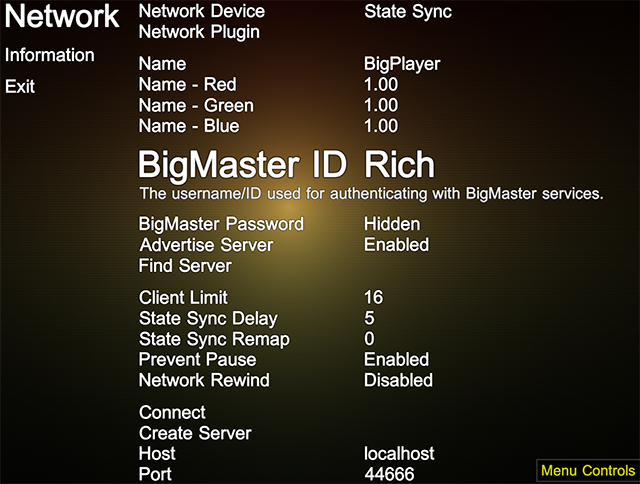
12. Network Support
BigPEmu supports several network device modes (on select platforms), all of which can be enjoyed over LAN/Internet and even locally (via loopback) for splitscreen/multi-monitor configurations. For a normal multiplayer session, most users will want to use the "State Sync" device mode. One user elects to be the host by choosing the "Create Server" option (optionally enabling "Advertise Server"), and all other users use the "Connect" or "Find Server" option. (the latter is only appropriate if the host has "Advertise Server" enabled, otherwise each connecting user must enter the host's address manually via the "Host" menu item)
Some network device modes will behave better in bad latency/packet loss scenarios than others.
State Sync
This is a generic synchronization mode which will work with any software. By default (unless otherwise dictated by the "State Sync Remap" setting), inputs will be assigned by the host according to client order. If you notice frequent gameplay disruptions in this mode, you may wish to increase the value specified by the "State Sync Delay" setting (which is in units of frame time) at the expense of adding latency. On a well-optimized LAN, by contrast, you could decrease this value to 1 or 2 without issue. Additionally, "Network Rewind" can be enabled to hide latency. When this option is enabled, an emulated state history is stored and the emulator continues emulating frames even when remote input data hasn't been received. If a new input comes in which doesn't match the input used to emulate a given frame, the state is pushed back to that frame and every subsequent frame is re-emulated. Emulating many frames in the time span of a single native frame may be very (computationally) demanding, so the "Network Rewind" option may be tasking even for relatively powerful host machines.
JagLink
JagLink emulates the original Jaguar network device of the same name by funneling JagLink serial data over the network. This works pretty well with loopback sockets, but is extremely error-prone with any kind of latency, so you may encounter problems even in some LAN scenarios. This is because Jaguar software could be written to expect minimal latency during (often lock-stepped) exchanges of data over a local serial interface, so the latency introduced by throwing packets over UDP (especially if there is packet loss) may cause the Jaguar software itself to seize up or move forward without the data it was expecting. As such, although you may attempt to use this mode over the Internet, you shouldn't be surprised by mishaps.
Script
Script mode allows custom scripts to handle all high-level network data transfers, with an underlying engine to handle delta compression, reliable delivery, and sequencing. Use this mode when the script you want to use (such as the Alien vs Predator multiplayer script) requires it.
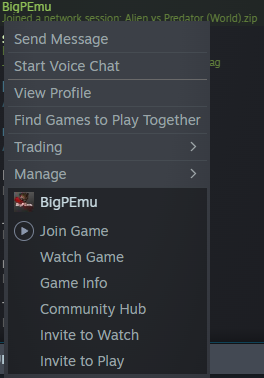
Normally, each network device mode relies on an underlying engine in BigPEmu to reliably sequence and deliver data via UDP. Hostname lookups are supported, and the user is responsible for ensuring the relevant port is accessible on the host machine. However, this behavior may vary per platform. Steam builds, for example, use Steam interfaces for all low-level network communications. This has various implications, and may or may not perform worse (in terms of latency and packet loss) than the standalone engine.
Steam builds also support server lists and are integrated with Steam's friend/invite systems. However, server lists are subject to lots of Steam backend requirements (which Valve doesn't seem to have done a good job of documenting), so getting your server to show up on the "Public" list may require some sort of port forwarding (of both the specified UDP port and UDP port 27016, the default query port) in addition to enabling the "Advertise Server" option. Fortunately, BigPEmu offers a couple of workarounds for this. The "Friends" filter automatically digs remote join data out of your Steam friends list for anyone running BigPEmu, so their sessions will appear in the list even if the Steam master server fails to report them.
As of version 1.2, non-Steam builds of the emulator also feature integrated support for the
BigMaster service. This service allows you to advertise your server and invite others to join via custom URL. You can copy/paste the appropriate URL request using the "Copy Session URL" and "Paste Session URL" items in the Network menu. You can also use the
-reguri command line option if you'd like to be able to feed
bigpemu:// URL requests directly to the application. The application only needs to be run with
-reguri one time, assuming registration is successful.
In non-Steam builds, servers will be automatically registered with the BigMaster server if the "Advertise Server" option is enabled. This means that everyone else will be able to see your server, so take care to set a password before creating the server if you'd like to limit who is able to join.
On all platforms which support network functionality, chat is bound to "T" on the keyboard by default. (if your configuration file predates the introduction of network support, you may need to manually bind the input) Recent chat/notify messages and client/server status will be displayed when the chat window is active.
If you're experiencing
audible skips/pops along with a low native framerate, make sure you're running on adequately powerful hardware. If you notice that audio is periodically shifting in frequency, this typically isn't a problem in the emulation, but is indicative of poor performance. On some platforms and in some timing scenarios, the audio backend may elect to resample audio frames rather than missing frames entirely when the emulator is not able to run at the target framerate. BigPEmu has fairly low system requirements, with much of the Jaguar's retail cartridge library running fine on most processors (in the x64-capable realm) with clockspeeds around 1GHz. However, some games in the library may require something closer to 1.4GHz. (if there are few to no idle cycles, heavy Blitter use, etc.) CD games are generally more expensive (usually due to more excessive interrupt requirements), and some may require clockspeeds closer to 1.6GHz to run smoothly.
If you're encountering
performance/heat problems (or just looking to improve battery life) with one of BigPEmu's mobile ports, you may wish to try enabling the "Energy Conservation" option in the Jaguar's system settings. (under "System" and "Settings" in the menu) If performance-related audio problems persist, you can also try setting the "Buffer Size" option in the "Audio" menu to "Very Large". Take care to terminate and restart the application process after changing either of these options. This is not guaranteed to remedy performance problems, but it may help smooth things over in some circumstances. Note that enabling the "Energy Conservation" option would normally work against performance, so this is not recommended in cases where thermal throttling is not a significant performance consideration.
If you encounter any
problems with your preferred input device, you may wish to try an alternate input plugin. (if you're running on a platform where the emulator does offer multiple input plugins, such as Windows) The input plugin can be selected through the "Input Plugin" option under the Input menu. Some input devices may be better supported by some input backends than others. The Windows distribution of BigPEmu defaults to using the
BigPEmu_Input_DirectInput plugin, but
BigPEmu_Various_SDL2 is already included in the distribution as an alternative.
If BigPEmu
initially ran without any issues but has stopped working, resetting your configuration is the first thing you should try. If you're still able to run BigPEmu, you can select the "Factory Reset" option in the "Information" menu. Otherwise, you can accomplish this by deleting your
BigPEmuConfig.bigpcfg file. Under Windows, this file is located at
%APPDATA%\BigPEmu\BigPEmuConfig.bigpcfg. (which usually resolves to something like
C:\Users\YourUsername\AppData\Roaming\BigPEmu\BigPEmuConfig.bigpcfg) Under macOS/iOS/etc., it may make sense to reinstall the application bundle, making sure that the "Documents" folder associated with the application is destroyed in the process. Take care to preserve any other user data you'd like, such as saved states, when reinstalling the application bundle on relevant platforms. You may also wish to make a backup of your configuration file before deleting it, in case deleting it doesn't solve your problem, or in case you'd like to later troubleshoot to identify which setting is causing your problem.
If BigPEmu still fails to load with a default configuration file, the next step is to enable logging and check the log file. See
Command Line Options for more information. The log may reveal more information about the problem which BigPEmu is encountering on your system. You can also try the
-forcecompat command line option to attempt to rule out problems with the video plugin.
If logging reveals that there's a problem while initializing one of BigPEmu's default plugins on your system, you may want to try manually editing the
BigPEmuConfig.bigpcfg file at its default location (mentioned above) by opening it in your text editor of choice. Even after a failed initialization attempt, the emulator will still generate the default configuration file unless there's a problem with the filesystem. If more than one plugin for a given category exists for your platform of choice (check the list of modules under the
Plugins directory in your BigPEmu distribution), you may manually edit the "VideoPlugin", "AudioPlugin", and "InputPlugin" fields in the configuration file to try alternative plugins.
When all else fails, or when you determine that you're experiencing a problem related to the video plugin, update the drivers for your graphics/display device. There's always a fairly good chance that some basic OpenGL feature is somehow broken in any given version of any given vendor's drivers, because that shit happens. It's certainly happened to me more than once!
After verifying that your display device driver is up to date and functioning correctly, it's also a good idea to make sure all of the other device drivers on your system are up to date. If you're running under Windows, make sure there are no issues reported in the
Device Manager.
If you're encountering
an issue with a particular piece of software, such as an audio timing or stability problem, see if the software is listed on the
compatibility page. If it is, make sure the
hash for your cartridge/disc image matches the one provided on that page. Additionally, you can try making changes to the Jaguar's system settings (under "System" and "Settings" in the menu) to see if any of these overrides help. You may have to restart the Jaguar, or at least reload a saved state, for some of those settings to take effect. The first setting to try is "Lockstep Mode", setting it to "Close" or "Closest" can potentially resolve many different issues. This option does place a greater performance burden on the host machine, but your machine can probably handle it. In some rare instances, changing "Blitter Speed" to "Free" may alleviate timing issues, but take note that this is more often likely to create stability problems.
For disc-based software, changing the "CD Seek Speed" setting (for example, setting it to "Free") may resolve timing or stability issues. Some titles in the known software library may require this, as they'll crash even on hardware in some circumstances if disc seek times vary too much. Additionally, do not explicitly set a cartridge image when running CD software, unless the CD software is designed to work with that cartridge. This has the potential to cause all kinds of adverse effects.
When running on a platform which requires files to be imported before they can be loaded, you may wish to avoid importing locked/protected files. This can cause permission issues to arise (which are problematic for the application itself to deal with when it is, for example, running as an iOS application under macOS), forcing the user to manually intervene when clearing out all imported data. If you do run into this problem, the emulator's resulting error message will provide you with the path to the offending data.
If none of the above has resolved your problem, you may have a genuine bug on your hands (or maybe a terrible virus is ravaging your system), so you can head on over to the
bug report section.