FX Fighter
April 20, 2011 at 5:49 am (CST)
11 comments
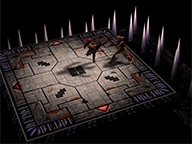 A few days ago, I decided to reverse engineer FX Fighter. Being a poor boy, I missed out on most of the Saturn gaming era, and FX Fighter running on my old 486 was my first actual experience with a 3D fighter outside of the arcade. So it'd been sitting on my list of games to reverse for nostalgia's sake, and I figured I'd tackle it one day, hopefully using a nice IDA Pro plugin for DOSBox integration that handled DOS4GW applications. (there is a plugin, but I've had no luck getting it to debug 32-bit DOS apps) But the urge just struck me last weekend, and I decided to go after it armed with nothing but IDA Pro and an old build of DOSBox with its debugger enabled. Now I'm going to write a whole article about the process!
This isn't so much intended to be a file spec, as it is just a direct chronicle of my experiences and findings in figuring the game's formats out, in the actual order of my work/discovery. It's like you're right there scoping through the binary with me! I'll describe all of my approaches and general methodology here, as well, so get ready to digest a lot.
The first thing you tend notice when looking at FX Fighter's data is the presence of all of those .cmp files. FX Fighter uses a proprietary compression algorithm, which it turns out is just a simple form of RLE. You could figure it out from staring at the binary long enough, but knowing the game's exe is hardcoded to load a number of those .cmp files, I jumped straight in with IDA. I cross-referenced one of those .cmp filename strings and found this:
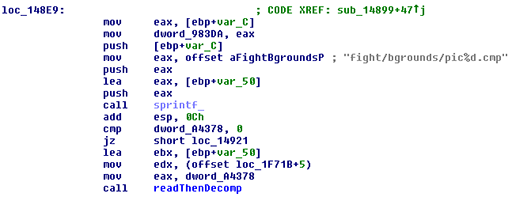
As you can see, I've already investigated the call, and renamed it to "readThenDecomp" in IDA. This readThenDecomp function calls fopen and fread for the .cmp file and allocates some memory. If the reading is successful, it calls a procedure that I've named "decompData".
Reading through this decompData routine, it becomes quickly apparent that it's doing the decompression, and you can tell what registers are expected to contain on entry from the way the associated memory is read from and written to in the code. Just for fun and education, I've gone and commented every bit of this assembly function.
	push	ecx
	push	esi
	push	edi
	push	ebp
	mov	ebp, esp
	sub	esp, 20h
	mov	[ebp+var_20], eax //eax is a pointer to the dest buffer
	mov	[ebp+var_1C], edx //edx is a pointer to the source buffer
	mov	[ebp+var_18], ebx //ebx is the size of the decompressed data
	mov	dword ptr [ebp+var_C], 0x00000000
	mov	dword ptr [ebp+var_10], 0x00000000

loc_11227: //check if the dest pointer has hit the dest buffer length
	mov	eax, [ebp+var_C]
	cmp	eax, [ebp+var_18]
	jge	short loc_11235 //jump here if done
	cmp	[ebp+var_10], 0
	jz	short loc_1123A //jump here if not done

loc_11235:
	jmp	loc_112DE //all finished, get out of here

loc_1123A:
	mov	eax, [ebp+var_1C] //get source pointer into eax

	inc	dword ptr [ebp+var_1C] //increment the source pointer in mem

	mov	al, [eax] //read byte from source
	mov	[ebp+var_8], al //put src byte in mem
	not	[ebp+var_8] //not src byte
	xor	eax, eax //clear eax
	mov	al, [ebp+var_8] //move not'd source byte back into low byte of eax
	cmp	eax, 80h //is eax 0x80?
	jge	short loc_1128B	//if eax (not'd source byte) is >= 0x80
				//(so < 0 signed), go to loc_1128B

	inc	dword ptr [ebp+var_8]	//increment the byte that was just read
					//(so non-run-length batches are len+1 long)

	xor	eax, eax //clear eax
	mov	al, [ebp+var_8] //get the incremented source byte into low bits of eax
	add	[ebp+var_C], eax	//increment the dest pointer in memory by
					//the given count
	mov	eax, [ebp+var_C]
	cmp	eax, [ebp+var_18] //see if this next batch is gonna exceed the dest size
	jle	short loc_1126C //if it won't exceed, jump here
	inc	dword ptr [ebp+var_10]

	jmp	short loc_11289

loc_1126C:
	dec	dword ptr [ebp+var_8] //decrement the source count byte

	cmp	[ebp+var_8], 0FFh //see if the run is done yet
	jz	short loc_11289 //if done, jump here
	mov	eax, [ebp+var_1C] //get source pointer into eax
	inc	dword ptr [ebp+var_1C] //increment source pointer

	mov	dl, [eax] //get a byte from the source buffer
	dec	dl //decrement it (weird)
	mov	eax, [ebp+var_20] //get the dest pointer into eax
	inc	dword ptr [ebp+var_20] //increment the dest pointer

	mov	[eax], dl //move the decremented source byte into the dest buffer
	jmp	short loc_1126C //jump back up to continue

loc_11289:
	jmp	short loc_112D9

loc_1128B:
	xor	eax, eax //currently eax has the source byte...now clear it
	mov	al, [ebp+var_8] //move the not'd source byte into low byte of eax again
	cmp	eax, 80h //check not'd source byte
	jz	short loc_112D9
	mov	al, [ebp+var_8]	//move the source byte yet again,
				//looks like compiler retardedness
	neg	al //reverse sign to convert it into a count
	inc	al //add 1 to it
	mov	[ebp+var_8], al //store to mem over the old not'd source byte
	xor	eax, eax //needlessly clear the high bits of eax
	mov	al, [ebp+var_8]
	add	[ebp+var_C], eax //increment the dest pointer
	mov	eax, [ebp+var_C]
	cmp	eax, [ebp+var_18] //check dest pointer against dest size
	jle	short loc_112B6 //if the dest buffer isn't out, jump to loc_112B6
	inc	dword ptr [ebp+var_10]

	jmp	short loc_112D9

loc_112B6:
	mov	eax, [ebp+var_1C] //get current source pointer into eax
	inc	dword ptr [ebp+var_1C]

	mov	al, [eax]	//read the next byte from the source stream,
				//following indication of a run length byte
	dec	al //subtract 1 from it (weird)
	mov	[ebp+var_4], al //store it to memory

loc_112C3:
	dec	dword ptr [ebp+var_8] //decrement the rle byte count

	cmp	[ebp+var_8], 0FFh //are we done with this run yet?
	jz	short loc_112D9 //if done, jump to loc_112D9
	mov	edx, [ebp+var_20] //grab the dest buffer pointer to edx
	inc	dword ptr [ebp+var_20] //increment the dest buffer pointer

	mov	al, [ebp+var_4]	//read the byte that was read out of the source
				//(and decremented by 1)
	mov	[edx], al //...and plop it into the dest
	jmp	short loc_112C3 //hop back up for the next iteration

loc_112D9:
	jmp	loc_11227 //jump here when done with rle run, then back up

loc_112DE:
	mov	eax, [ebp+var_10]
	mov	[ebp+var_14], eax
	mov	eax, [ebp+var_14]
	mov	esp, ebp
	pop	ebp
	pop	edi
	pop	esi
	pop	ecx
	retn
I think that describes it all, at least. I pounded all of that out after the fact while re-skimming the code, for the sake of this article and an assembly-curious friend. In C/C++, it all translates into something like this:
void DecodeCMP(BYTE *dst, BYTE *src, int decompSize)
{
	int srcPtr = 0;
	int dstPtr = 0;
	while (dstPtr < decompSize)
	{
		char rleOp = ~(char)src[srcPtr++];
		if (rleOp >= 0)
		{ //chunk of data (but dest byte is still source byte minus 1)
			int count = rleOp+1;
			for (int i = 0; i < count; i++)
			{
				dst[dstPtr++] = src[srcPtr++]-1;
			}
		}
		else
		{ //run-length
			BYTE b = src[srcPtr++]-1;
			int count = -rleOp+1;
			for (int i = 0; i < count; i++)
			{
				dst[dstPtr++] = b;
			}
		}
	}
}
Subtracting 1 from all of the source data bytes, even for literal reads, is pretty unusual. This threw me at first when looking at the binary.Now that all of that's out of the way, the path is open to textures and other random data. Most textures in the game which are associated with a model are 256x256 8-bit images, and each mesh of the model is given a 64x64 tile within that 256x256 texture page. There's more on that further down.
One necessary thing in being able to display those textures is finding the appropriate palette. Global palettes (or color maps, as they're referred to internally) are actually stored at the start of the BGROUNDS/PIC*.CMP files (once they've been decompressed), and the palette occasionally differs according to the ambiance/theme of the stage. You can apply any of these palettes to the model textures.
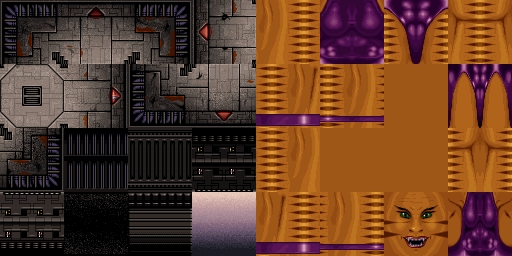 Examples of a stage texture page and a character texture page, with background 0's palette applied.
At this point, I started looking into the .dat files, which is where all of the models are stored, from stages to characters. I was able to eyeball the basics of the format in my hex editor without needing to do any disassembling. It is, however, kind of a pain in the ass to parse. It's one of those formats where you have to know the data to get past it. It starts out like this:
typedef struct fxDatHdr_s
{
	BYTE			unkA[3];
	int			unkB;
	WORD			unkC;
} fxDatHdr_t;

typedef struct fxDatMesh_s
{
	BYTE			unkD;
	WORD			unkE; //0xFA 0xCE
	BYTE			unkF[4];

	BYTE			unkA[3];
	WORD			meshType;
	WORD			unkB; //probably data size but not applicable
	WORD			nameLen;
	//null byte, then name
} fxDatMesh_t;
The first 7 bytes of the mesh structure are only non-0 for the first mesh. Mesh type should also always be 54/0x36. Each mesh in the file runs up against the previous one. There are no offsets (that I'm aware of), and to get to the next mesh, you have to fully parse through the current one. After the mesh header, you'll be dealing with these structures:
typedef struct fxDatGeoHdr_s
{
	WORD			unkA;
	WORD			type;
	WORD			dataSize;
	WORD			dataSizeB;
} fxDatGeoHdr_t;
Those headers tell you what type of data you're going to be reading in, and the total size of the data is dataSize+dataSizeB together. You keep reading geometry groups in past the mesh header, until type is 0, which means you've reached the end of the mesh's geometry list. Texture/color/etc. bank chunks also seem to be the special case, where the size given won't get you past the data, and you have to parse the bank names out yourself.Also of note is that you should be able to parse the file by treating meshes (type 54) as just another fxDatGeoHdr_t, if you so desire to structure your parsing logic in this manner.
There are 5 main types of geometry data underneath each mesh:
23/0x17
Floating point vertex positions, 12 bytes (XYZ) per entry. Vertex positions and texture coordinates are, unlike the rest of the format, stored in big-endian format. FX Fighter converts them to little-endian on load. These data chunks also always have an additional 4 bytes tacked onto the end.
24/0x18
Floating point texture coordinates. As mentioned, these are stored as big-endian. They also have 4 bytes tacked onto the end, like positions.
53/0x35
Triangles. This chunk contains 2 shorts at the beginning, which specify the number of triangles when added together. The first word will typically only be non-0 for meshes where the referenced vertex count meets or exceeds 256. (this requires special behavior in handling the triangles) The rest of the data is a list of triangles.
22/0x16
The bank list. Typically, banks beginning with TX will reference the model texture page, where bank names that don't begin with TX (in the case of character models) will reference special color banks. The actual structure of this chunk consists of a byte 2 bytes in, which is the number of banks, and then the actual bank strings, which can be parsed based on the termination (0) characters.
26/0x1A
Triangle bank indices. This chunk starts out with 4 shorts, the first 2 corresponding to the shorts at the start of the triangle chunk. The rest of the data is short-sized indices - it's a list of indices into the bank list for each triangle.
After you've run through your geometry headers for a given mesh and collected the available data types (be warned, not all types are present for all meshes - some may lack UV's, for example), you can go ahead with rendering it. Most of the data types are pretty straightforward and obvious, but triangles are a little tricky:
typedef struct fxDatTri_s
{
	short			idx[3];
	BYTE			flags[3];
} fxDatTri_t;
You actually only want to use the low 8 bits of each idx value as your raw index value. The higher bits have special flags, some of which are necessary to determine the base offset value for your index. This comes into play when you have meshes that use more than 256 vertices. Additionally, flags[2] is a base offset for each index, but it can be overridden by the high bits of each index.After some trial and error, I came up with the following to handle all of the game's meshes:
	int idx[3];
	for (int k = 0; k < 3; k++)
	{
		idx[k] = (tri->idx[k] & 255) + baseAmt;
		if (tri->idx[k] & 256)
		{ //reset to 256 offset
			baseAmt = 256;
		}
		else if (tri->idx[k] & 512)
		{ //reset to flag-based offset
			baseAmt = flagBase;
		}
		else
		{ //reset to 0
			baseAmt = 0;
		}
	}
	//reset to flag-based offset after each triangle
	flagBase = tri->flags[2]<<8;
	baseAmt = flagBase;
This code will give you raw 32-bit indices into the position/UV arrays. In figuring stuff like this out, a debugger for your own parser is a lot more important than a hex editor, if you want to get the job done fast. You can check values as you parse through them, test bits, insert custom code to manipulate and test patterns in the data, and a lot more.For each triangle, as well, if the mesh you're dealing with had a type 26 chunk, you also have a list of bank indices for each triangle. That index is into the list of banks provided by the type 22 chunk. So, what do the banks mean? Well...
There are 2 main types of banks used in most models - texture banks and color banks. As mentioned, the usual standard (though there are special cases, such as for the PLANETS banks) is "if it starts with TX, it's a texture bank, otherwise it's a color bank." Handling texture banks is usually pretty easy, just reference the main texture page for the mesh. Color banks are trickier. To understand them, we can find the BANK structures in the exe with IDA. Here's an example:
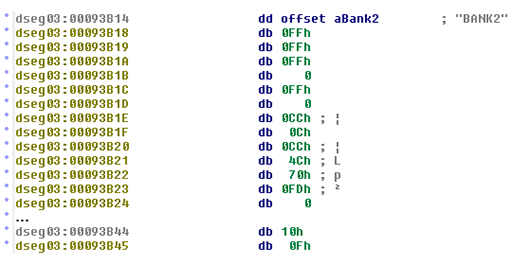
The important thing here is the value at dseg03:00093B44. You'll notice that for each bank, this value increments by 16/0x10. This is actually the base index into the active palette, where a value between 0x00 and 0x0F can be added to the base index to adjust the "brightness" because of the way the game's palettes are laid out.
So, every time a triangle references a color bank, you should assign it with a material that has a solid diffuse color of the corresponding bank's palette index.
For textured triangles, handling texture coordinates from the type 24 chunk is pretty straightforward. If you split the main texture page into separate 64x64 textures yourself, you don't have to do a thing to the texture coordinates. If you want to keep the pages intact as I did, you just have to scale-and-bias the texture coordinates into the correct tile. Each mesh is guaranteed its own sequential block in the main texture page, so you can reliably use the mesh index to determine which region of the texture to use. None of the models seem to use coordinate wrapping, which allows this approach to be taken rather than pre-splitting the texture page. For ease of understanding, here's a table that represents the texture coordinate offset by mesh index:
static float g_uvOfs[16][2] =
{
	{0.0f, 0.0f}, {0.25f, 0.0f}, {0.5f, 0.0f}, {0.75f, 0.0f},
	{0.0f, 0.25f}, {0.25f, 0.25f}, {0.5f, 0.25f}, {0.75f, 0.25f},
	{0.0f, 0.5f}, {0.25f, 0.5f}, {0.5f, 0.5f}, {0.75f, 0.5f},
	{0.0f, 0.75f}, {0.25f, 0.75f}, {0.5f, 0.75f}, {0.75f, 0.75f}
};
So using this table, you could adjust your texture coordinates like so:float pageUV[2]; pageUV[0] = g_uvOfs[meshIdx][0] + vertUV[0]*0.25f; pageUV[1] = g_uvOfs[meshIdx][1] + vertUV[1]*0.25f;Now you should be able to apply textures to model bits (although your characters will still be in poorly-positioned pieces, until you get the animation data applied to your geometry), but you'll notice some of the characters have some pretty serious issues:
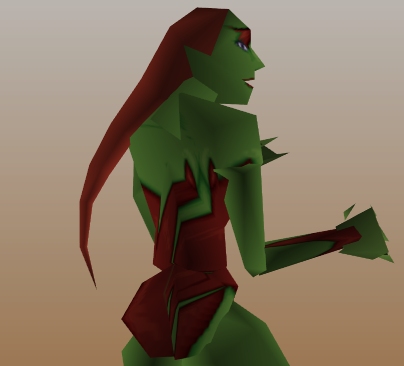
Upon closer inspection, it appears the U coordinates in the UV's are mostly ok, but they sometimes appear "backwards", as if the BRender rasterizer is expected to interpolate backwards based on the absolute distance to the desired texel. So I came up with a solution to address this on a per-triangle basis, measuring the distance between vertices on each triangle in UV space, and using 1.0-U if the distance is greater than half of the page size and the desired texel is closer when crossing the page backwards. And it worked!
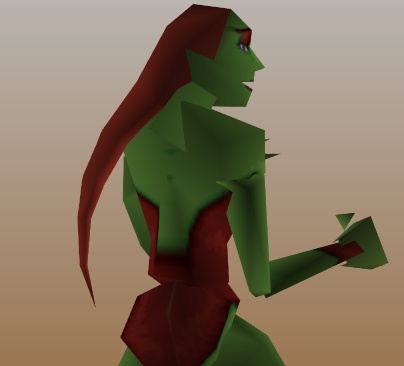
But wait a second...
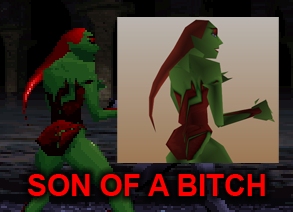
That's right, all of these models are actually busted in-game, haha. No fancy texel-distance tricks going on at all. I guess the resolution was so low that no one noticed or cared. I suspect the models became damaged somewhere in Argonaut's game-import process, as it very much looks like they tried to merge triangle vertices, but did not account for UV's (at all, from the looks of it) in the process. For shame. You can consider implementing my fix if you'd like to attempt an auto-restoration of the data, though.
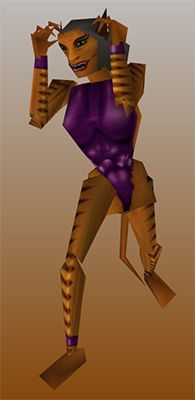
Now, if you've implemented all of the data and concepts discussed up to this point, your character models should look something like this horrible cluster of cat-lady bits:
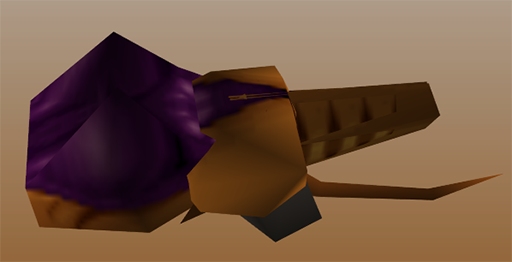
As you might guess, you need some bone (or bone-like) data to transform those pieces into the correct places. I was first and foremost concerned with finding some bone lengths or hierarchy data, but looking at the animation data in the .ani files reveals that such data is not necessary. FX Fighter stores all of its animation data as flat positions and rotations.
The main downside to this approach (assuming you don't otherwise want to use the hierarchy at runtime), and why a lot of games don't do it, is storage space. If you want to do some kind of delta compression on your animation, you want a hierarchy, so that moving 1 bone really only means 1 orientation change. When your data is flattened, moving the root bone means numBones changes, rather than 1 change, and that is horrible for delta compression. But as it turns out, FX Fighter doesn't do any kind of compression anyway, short of just using limited-precision data types. It's likely that they valued the lack of more hierarchical transforms over the excess use of memory. (not that memory seems to have been a chief concern at all on this title, as evidenced by the use of texture pages)
The .ani files are laid out using these structures:
typedef struct fxAnimHdr_s
{
	int			numBones; //or meshes in this case
	int			totalSeq;
	int			totalFrames;
} fxAnimHdr_t;
typedef struct fxAnimSeq_s
{
	char			name[8];
	float			speedScale; //more disassembly is needed to verify this
	int			unkB;
	int			numFrames;
} fxAnimSeq_t;
typedef struct fxAnimFrHdr_s
{
	int			unkA;
	int			unkB;
	int			unkC;
} fxAnimFrHdr_t;
typedef struct fxAnimOri_s
{
	char			ang[3];
	char			pos[3];
} fxAnimOri_t;
numBones in the header will correspond to the number of meshes in your model file. This format is pretty easy to read just by looking at it in a hex editor, and you can see the data is laid out like:fxAnimHdr_t For each sequence up to totalSeq: fxAnimSeq_t For each frame up to numFrames: fxAnimFrHdr_t fxAnimOri_t * numBonesThe angles in the orientations are ZXZ rotations, in slightly funky transform space, with positions flipped on X. Once you get those converted into a more convenient representation (like a matrix), you have a list of orientation data up to numBones for each bone/mesh in every frame. So just take the frame you want, get the orientation from that frame using the index of your mesh, and transform every vert in the mesh with that orientation. Now your cat-lady bits become:
That pretty much does it, then. Implementing all of these things will give you access to every model in the game. It was totally worth it, wasn't it?
I hope this was educational or at least interesting for a few people. Being able to recognize data like this, and track handling of said data through disassembly, isn't an ability that tends to come quickly or easily for most people. There is also no single "fixed" approach to reversing every type of data out there, even within the sub-context of video games, and even further within the sub-context of video game models and animations. You're always going to come across something new, and you have to have patience to be able to understand it and recognize it in an otherwise-foreign context. So if it takes you 3 months to figure out a single game's model format, don't be discouraged. It only gets easier as your base of knowledge expands. Once you get enough experience disassembling and debugging, cracking any form of compression or encryption with a debugger on-hand becomes trivial. Of course, when you can't use a debugger... well, then you just have to figure out a way to use a debugger.
Now, go get started on some Noesis plugins!
Comments
11 comments in total.Post a comment
IP: 68.160.134.193
Foolio
December 2, 2022 at 3:20 pm (CST)By the way, I have now tried out BigPEmu and it is fantastic! This is one of the most significant things to happen to the jaguar fan/retrogamer/jaguar indie developer community and I feel like we're at the start of an awesome new era in that very niche scene that I'm a part of. I also appreciate the intro, I was wondering if it was at all inspired by Bloodlust software and its various games/emulators, which I had the joy to experience in my own youth, and it was neat to see in the FAQ on your website that it is! Fantastic and impressive work on this! PS doesn't Fight For Life seem an awful lot like FX Fighter? PPS I do not have twitter and commenting on this topic seemed like one of the more convenient ways to casually message you and express my gratitude and props! Apologies for being off topic from the FX Fighter post, which is also really neat, spent time with it in the 90s on my Pentium as well when PC Gamer, blinded by its texture mapped 3D graphics, gave it a review score in the high 90s%. Sincerely, Foolio
IP: 166.198.25.21
Foolio
November 30, 2022 at 5:15 pm (CST)Rich, I only just discovered your website today due to the spread of the news about your Jaguar emulator, but I love every project on this website. I am very glad I've discovered you and your projects and am looking forward to diving into them and exploring/experiencing them!
IP: 82.27.61.151
Duffy
May 21, 2011 at 6:08 am (CST)Thanks, that helps alot =] i understand how it can be seen as worse as it does break up the flow of the code, but the comments can be seen fully now =] the font settings are standard IE settings =]
IP: 68.0.165.94
Rich Whitehouse
May 6, 2011 at 1:23 am (CST)Looks fine for me. I guess your font size/scale defaults are different or something. I turned word wrapping on for pre tags, although I think that looks worse in some cases. You may need to ctrl+F5 (or whatever the equivalent is for your browser) to see the change.
IP: 82.24.47.231
Duffy
May 6, 2011 at 12:34 am (CST)Hi Rich, Interesting read, one little query, any plans of tweaking your site as longer lines of text dissapear, maybe a view fullscreen button? =] (i'm aware that copy and pasting elsewhere helps, but can be a ball-ache)
IP: 68.0.165.94
Rich Whitehouse
April 28, 2011 at 8:47 am (CST)It was causing some verts to shoot off into infinity during animation. Which is a little weird, because I can't imagine why or where I would be dividing by an axis length. But I was too lazy to actually investigate it, and just constrained the bone scale in the GMO loader instead.
It also caused some problems with FCollada, though, where FCollada would "fix" it by normalizing it. So I think constraining it was for the best.
IP: 174.55.187.187
ukurereh
April 28, 2011 at 3:08 am (CST)Out of curiosity, what kind of problems do bones with 0 scale cause? Anything spectacular?
IP: 68.0.165.94
Rich Whitehouse
April 27, 2011 at 9:42 am (CST)Oh dear. It looks like I just did that a few weeks ago. There was another game that used extremely tiny bone scales to shrink surfaces out of view, and it was one of those "works on the R4000" cases, but on anything x86-based, rounding error will give you 0 the first time you perform an operation on the value. (and a bone scale of 0 causes various problems) So I just enforced a minimum scale value, but I forgot to make it an abs check. Gitaroo Man Lives is flattened because it uses a negative bone scale on one axis which gets clipped off to the minimum float value.
There's a new release up to fix it now.
IP: 174.55.187.187
ukurereh
April 27, 2011 at 4:52 am (CST)Jesus godchrist, I just realized how long it's been since I last downloaded Senor Casaroja's censored stash. Time to read the plugin source and get my ass kicked. Maybe I'll get to learn how to use a debugger properly, if that doesn't kick my ass too.
P.S. Gitaroo Man Lives models broke pretty hilariously/horrifically sometime in the last 20-odd updates. Such twisted horrors were never meant to be seen by humanity... let's go watch some more!
IP: 68.0.165.94
Rich Whitehouse
April 21, 2011 at 3:43 am (CST)Haha, well, in terms of languages used, there was some x86 assembly, and some C/C++. (the latter mostly used for struct definitions) I think if you know those two things reasonably well, and you have some general knowledge about how 3D rendering works, you should be able to understand it all pretty well.
The best way to learn about 3D rendering is to start making your own 3D engine, in my opinion. If you're completely new to that, I would recommend starting with OpenGL or Direct3D, and just easing your way through a bunch of tutorials. Back in the day, NeHe had a good series of OpenGL tutorials that covered a lot of ground, so that might still be good. Before you start on that, though, learning C/C++ would be a good idea. Although it may not be necessary, if you already know another language with an OpenGL implementation. A lot of NeHe tutorials also cover a pretty wide range of programming of languages.
[1] 2 ... Next
Post a comment
Stream Tags
Projects
Everything
Personal
Analysis
Indie
Technology
AVALANCHE
R-Cube Engine
Modding
Game Design
Commercial
iPhone
Euphoria

Recent Comments
13379141 page hits since February 11, 2009.
Site design and contents (c) 2009 Rich Whitehouse. Except those contents which happen to be images or screenshots containing shit that is (c) someone/something else entirely. That shit isn't really mine. Fair use though! FAIR USE!
All works on this web site are the result of my own personal efforts, and are not in any way supported by any given company. You alone are responsible for any damages which you may incur as a result of this web site or files related to this web site.


